Import tracking categories
1. Login to AgriSmart
2. Click on Setup
3. Scroll down to Xero options
4. Click on Import tracking categories
5. Click OK
Assign a tracking category to a client
Xero
1. Login to Xero and navigate to Contacts > Customers
2. Locate the customer (client) and click into their contact
3. Click Edit
4. Go to Sales defaults
5. Select the applicable category option:

6. Click Save & close
7. Open AgriSmart and navigate to Setup
8. Scroll down to Xero options
9. Click Import Xero contacts
10. Click OK
AgriSmart
1. Click on Clients
2. Locate the client and click the paper & pencil icon
3. Select the Xero tracking category and the Xero tracking option:

4. Click Save
Xero wages bill
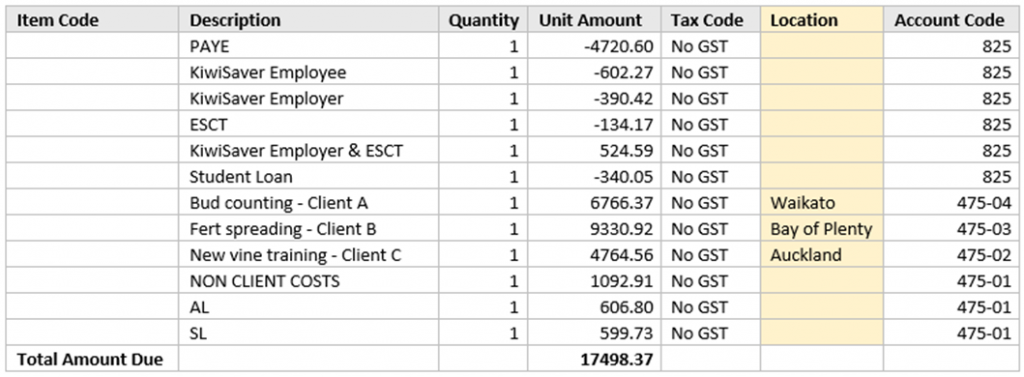
If tracking categories have been set up and imported correctly, they will appear in the draft wages bill generated in AgriSmart.
Example:


There is one tracking category set up in Xero and this is called Location. This is shown in the yellow column above.
Bud counting is a timesheet activity code which is assigned to a job that is attached to Client A. This is why Bud counting – Client A has pulled through to the Description column.
As Client A has the Waikato tracking option allocated to it, this is why Waikato is pulling through to the Location column.
Troubleshooting
If tracking category options are not appearing in the bill, this means that the contact in Xero didn’t have the tracking category assigned before they were imported into AgriSmart. To fix this, refer to the Assign a tracking category to a client section.
