
1. Run the last pay in Entity A as normal. E.g. 02/10/23-08/10/23
2. Hover on Payroll > Pay Periods
3. Select the Team Member:

4. Select the date of the last day in the final pay period in the To field e.g. 08/10/23:

5. Select a year prior to the date in the To field and enter this in the From field e.g. 10/10/22:

6. Click GO
7. This should bring up 52 pay periods if the employee is paid weekly and has been with Entity A for one year or more, or 26 pay periods if the employee is paid fortnightly and has been with Entity A for one year or more:

8. Click ALL if the search produces more than one page of results
9. Click Export:

10. Hover on Reports > Total Leave Report
11. Select the Team Member and Date > GO:

12. Print or Export this page:

13. Hover on Setup > Team Manager
14. Locate the employee and click on their name
15. Click Employment Details
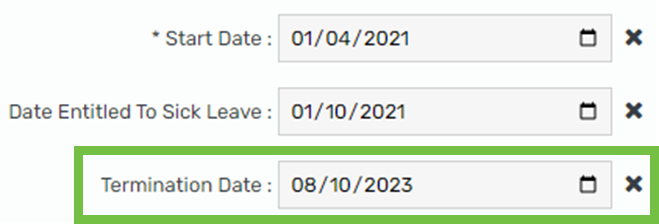
16. Enter the Termination Date e.g. 08/10/23 > Save:
17. Hover on Setup > Team Manager
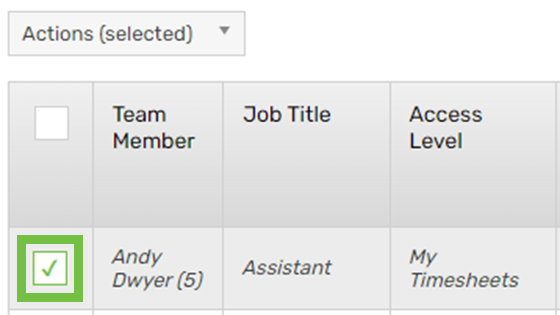
18. Locate the employee and click the check box in line with their name:
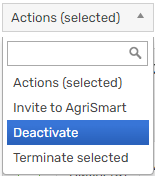
19: Click Actions (selected) > Deactivate:
20. Login to Entity B and add the team member as a new employee. Complete the General tab as normal, ensuring the Start Date is the same as what it was in Entity A e.g. 01/04/2021
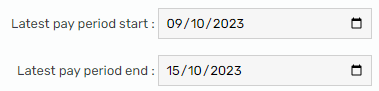
21. Enter the employee’s details as normal in the Employment Details tab, ensuring the pay period is correct e.g. 09/10/23-15/10/23:
22. Enter details in the Payroll tab as normal
23. Go to the Leave tab
24. In the Annual Leave section, enter the Cut-off date of Holiday Pay. This will be the date of the last day of the employee’s final pay period in Entity A e.g. 08/10/23
25. In the Alternate Days section, enter the Cut-off date of Alternate Days. This will be the date of the last day of the employee’s final pay period in Entity A e.g. 08/10/23
26. In the Sick Leave section, enter the Cut-off date of Sick Leave. This will be the date of the last day of the employee’s final pay period in Entity A e.g. 08/10/23
27. Scroll down to the bottom > Save
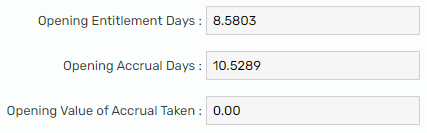
28. Scroll back up to the Annual Leave section and enter the Opening Entitlement Days and Opening Accrual Days per the Total Leave Report (refer to step 12 for an example):
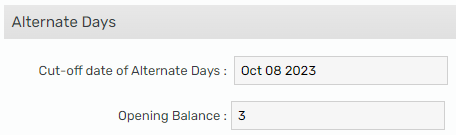
29. Go to the Alternate Days section and enter the Opening Balance per the Total Leave Report (refer to step 12 for an example):
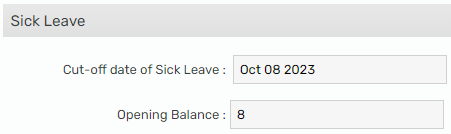
30. Go to the Sick Leave section and enter the Opening Balance per the Total Leave Report (refer to step 12 for an example):
31. Click Save
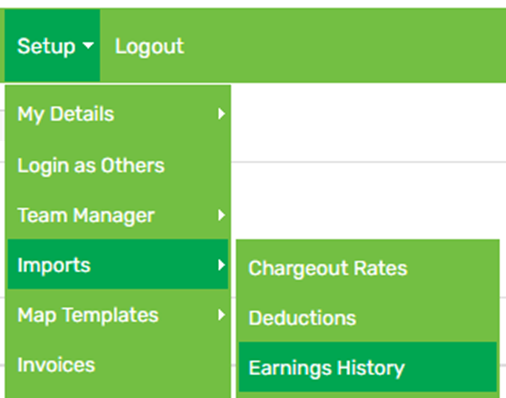
32. Hover on Setup > Imports > Earnings History:
33. Click Download template
34. Open the template (this should be located in your Downloads folder)
35. Also open the file you exported in step 9
36. In the import (the file you downloaded in step 33), enter the employee’s name in the Employee Name field
37. In this same import, enter the employee’s IRD number in the IRD Number column or enter the employee’s employee code in the Employee Code column
38. In the export (the file you downloaded in step 9), copy the data from the To column over to the Pay Period end date column in the import
39. In the export, copy the data from the No. of days paid column over to the Days Paid column in the import
40. In the export, copy the data from the Pay Amount column over to the Gross Earnings column in the import
41. In the import, copy the employee’s name down so there is a name in each line of data
42. Do the same with the IRD number/employee code
Your import should look something like this:

43. Save the import
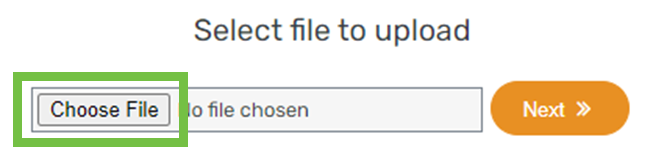
44. Go back into AgriSmart and click Choose File:
45. Select the file you just saved > Next
46. Tick the checkbox:

47. Scroll to the bottom and click Save
48. Hover on Reports > Total Leave Report
50. Check that all balances match the report from step 12: