General
1. Hover on Setup > Team Manager > click Add Team Member:

2. Enter an Employee Code (optional)
3. Enter a Username
4. A password is automatically created (see orange highlight). To change this, input a new password in the blank field (see green highlight):

5. Enter the employee’s First Name and Last Name
6. Select Casual (Holiday pay as you go) in the Employee Type field
7. Select Per unit in the Remuneration Type field
8. Select an option from the RSE worker field to ensure the employee’s sick leave is calculated using the correct method. For more information, click here
9. Select the Pay Frequency
10. Select the employee’s Start Date
11. Enter an Email Address (optional)
12. Enter a Job Title (optional)
13. Select a Team (optional)
14. Select a Primary Location and Other Locations (optional)
15. Select an Access Level. If you are unsure, select Just Payslip as this is the lowest access level. This can be updated at anytime.
16. Ignore the Remuneration % field
17. If the employee should be authorised to approve other employees’ leave, tick Approve Leave
18. Click the plus icon to open additional settings:

19. Update the Roster display colour (optional) and tick any other options that apply:

20. Click Add
Employment Details
1. Click on the Employment Details tab:

2. Enter their IRD Number (compulsory if subscribed to Payroll)
3. Select a Tax Code (compulsory if subscribed to Payroll)
4. The Date Entitled to Sick Leave has been automatically set to 6 months after the Start Date
5. If the employee is an active KiwiSaver member, enter the % that the employee contributes each pay period in the Employee KiwiSaver Contribution field. This will be 3%, 4%, 6%, 8% or 10%. If the employee isn’t a part of KiwiSaver, leave this blank
6. If the employee is an active KiwiSaver member, enter the % that the employer contributes each pay period in the Employer KiwiSaver Contribution field. The minimum employer contribution is 3%. If the employee isn’t a part of KiwiSaver, leave this blank
7. Select a KiwiSaver Status:
| Option | Description |
| Active KiwiSaver member | For employees in KiwiSaver |
| Opting into KiwiSaver | For employees who aren’t required to be automatically enrolled in KiwiSaver when they start work, but later choose to be in KiwiSaver and have completed a KS2. Once they’ve opted in, they can’t opt out |
| Not eligible for KiwiSaver | For employees who can’t be in KiwiSaver (for example, they’re not entitled to reside in NZ permanently) |
| Casual/temporary employee | For new employees who would normally be automatically enrolled but the length of their employment is less than 28 days. If their employment extends beyond 28 days, change their status to auto-enrol |
| Auto-enrol | For new employees who are not yet in KiwiSaver but must be enrolled in it. They can choose to opt out |
8. Enter a KiwiSaver Opted Out Date if the employee has opted out of KiwiSaver. This must be done 14 days (2 weeks) after their start date but no more than 56 days (8 weeks) after their start date
9. Select a KiwiSaver Exempt Income Reason (optional)
10. Update the SHO, SL and BR Basis (optional)
11. Enter the Actual Hourly Rate Paid. As the employee is casual (HPAYG) you must enter the holiday pay inclusive hourly rate. For example, if the employee will get paid $22.70 + holiday pay, you would enter $24.52 in this field
12. Enter a Minimum Hourly Rate if this differs to $24.52 (current minimum of $22.70 + 8%)
13. Enter a Per Period Non-Cash Benefit (optional)
14. Adjust the Sick day entitlement for the full year (optional). The statutory minimum is 10 days
15. Adjust the Agreed Paid Break (optional). The statutory minimum is 10 minutes
16. Check that the current pay period dates are correct. For example, if the employee starts on Tuesday 11/04/23 and you pay your employees weekly from Monday to Sunday, the pay period dates should be 10/04/23-16/04/23:

17. Enter a Bank Account Number. Compulsory only if you intend to pay the employee via the bank file
18. Click Save
19. Send the employee’s details to IRD. For help on this, click here
Payroll (optional)
1. Click on the Payroll tab:

2. Update the Payslip Option:

3. Skip the Regular Payments section as Casual (HPAYG) employees don’t receive any regular payments
4. Add any Regular Non-Taxable Allowances by clicking the plus icon:

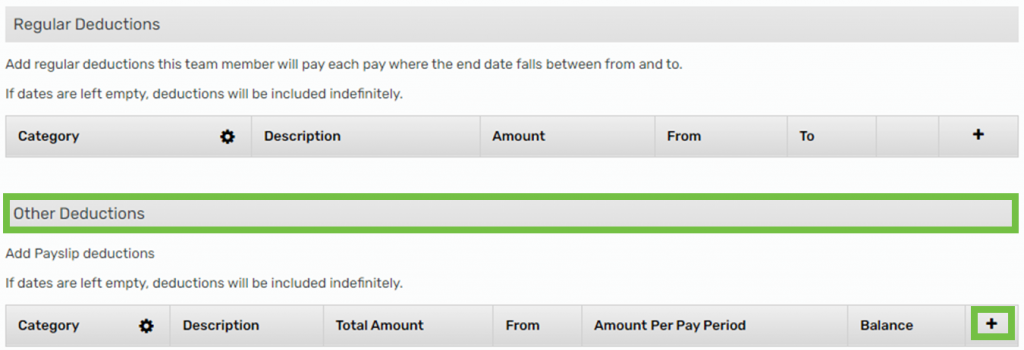
5. If you need to add regular deductions, please add them in the Other Deductions section by clicking the plus icon, rather than the Regular Deductions section:

6. If the employee pays child support, enter the per period amount in the Regular Child Support Payments field:

7. Click Save
Payroll Audit (optional)
1. Click on the Payroll Audit tab:

2. Work through each point accordingly
Notes (optional)
1. Click on the Notes tab:

2. Type a note in the blank field then click Add note:

Reminders (optional)
1. Click on the Reminders tab:

2. Click Add reminder:

3. Enter the reminder details, then click Save
Job Costing (optional)
1. Click on the Job Costing tab:

2. Enter the job costing details, then click Save
User Files (optional)
1. Click on the User Files tab:

2. Click Upload File:

3. Enter the file details, then click Save
Preferences (optional)
1. Click on the Preferences tab:

2. The following information can be added here:
- Personal details
- Phone number(s)
- Address
- Gender
- Date of birth
- Next of kin details
- Visa details
- Nationality
- Passport number
- Job position
- Visa type
- Visa expiry
- Medical information
- Look, feel & security
- Multi-factor authentication
- Timesheet settings
- SWSAS deductions
3. Click Save
Teams (optional)
1. Click on the Teams tab:

2. Select the team(s) that the employee will manage, then click Save:

